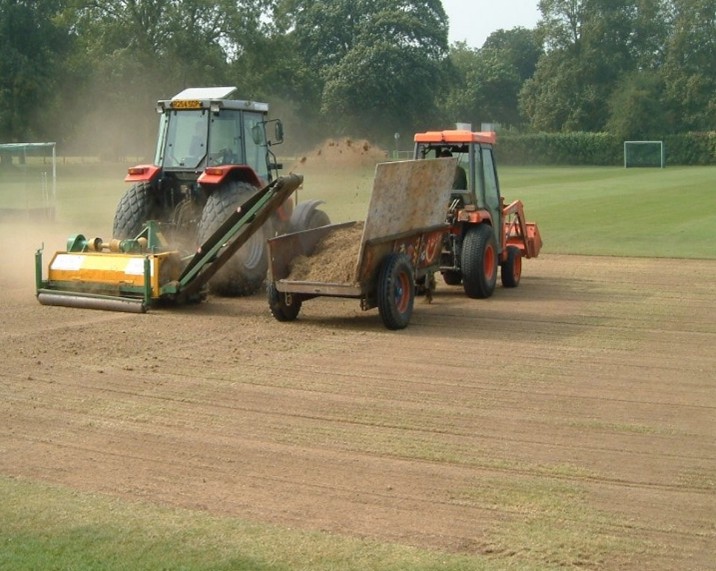
Grass Pitch Improvement Fund Packs 1 and 2 Project Support Guide What to Expect when your Grass Pitch improvement Fund project takes place and how to successfully see your project to completion Overview Summary Purpose of the Guide To help cricket organisations involved in Pack 1 or Pack 2 GPIF projects manage and complete their GPIF-funded pitch improvement projects successfully, ensuring optimal playing conditions for the next season. Pack 1 (Fraise Mowing) and Pack 2 (Square Resurfacing) require good aftercare to get you ready for next season – this guide shows you how. Preparing for your contractor • Communicate with contractor early. • Schedule work post-season. • Cut grass to 4–5 mm before work. • Mark square corners and ensure access. • Avoid work in wet conditions. What to expect afterwards • Square will appear bare and brown/grey. • New grass to emerge once it is raining. Aftercare and Grow-In • Fence off the square to prevent damage. • Irrigate if dry; rain is preferred. • Monitor germination (7–10 days typical). • Cut grass carefully once established (20 mm height into winter). • Use light, sharp mowers; avoid mowing when wet or frosty. Whilst every effort has been made to ensure the accuracy of the information contained in this guide, you should always comply with the law and follow best practice grounds maintenance guidance. Works should only be undertaken following a health and safety risk assessment by a trained and competent person using the right equipment in the right weather and ground conditions. If in doubt, contact your local County Pitch Advisor or the Grounds Management Association Page 2 of 10 Additional Maintenance • Fertilising: Support root development. • Weed Control: Prefer hand-weeding; herbicides only if necessary and under proper conditions. • Rolling: Gradually increase weight; avoid soft/wet conditions. Key Advice • Be patient and cautious. • Avoid machinery on soft ground. • Seek advice from County Pitch Advisors or the Grounds Management Association if unsure. Why this guide is important The guide shows you what to expect from your project, your contractor/supplier and how to see your project through the winter to make sure you are benefitting next season and enjoying cricket at your ground or facility. Who is this guide for? This guide is for all those involved in managing Pack 1 or Pack 2 Grass Pitch Improvement Fund (GPIF) projects at cricket organisations in receipt of a GPIF Grant. Details of what to expect and how best to manage your project before and after the works is shown in the following sections. Figure 1 Left: surface planing of a square (Pack 2). Right: placing and grading new loam on a square (Pack 2) Whilst every effort has been made to ensure the accuracy of the information contained in this guide, you should always comply with the law and follow best practice grounds maintenance guidance. Works should only be undertaken following a health and safety risk assessment by a trained and competent person using the right equipment in the right weather and ground conditions. If in doubt, contact your local County Pitch Advisor or the Grounds Management Association Page 3 of 10 Pack 1 (Square fraise mowing and minor levelling <10 mm) What is the aim of this pack? Pack 1: To remove shallow rooting undesirable grasses – especially annual meadow grass (Poa annua), dead or woody grass plants and thatch up to 10 mm below the surface level. Some surface levelling can be achieved in combination with topdressing. A new rye grass (Lolium perenne) dominated sward is established and play can resume at the beginning of the following season. What work does this pack involve? Pack 1: Using a tractor mounted machine, the contractor will aggressively deep-scarify or shallow plane the square and remove the dead or thatch material. This will be carried away on a trailer and is normally tipped on site to rot down. Once the contractor has done this, the grass sward is thinned down to only healthy, live grass (predominantly desirable rye grass) remains. The square is then seeded, fertiliser is applied and then topdressing spread evenly to smooth levels and cover the seed. It is really important that the contractor uses the same loam your square is constructed from (or if you’re not sure what it is constructed from, the loam you usually use to topdress your square at the end of the season) – if you are not sure then speak to your contractor and/or your County Pitch Advisor who carried out the PitchPower visit to your square. The amount of loam required is more than a normal end of season renovation – your contractor is likely to have this delivered in small 20 kg bags on a pallet but for larger squares may have the loam supplied loose-tipped or in larger 1 t bulk bags. How long does the contractor take? Pack 1: Typically, a contractor can complete the process from fraise mowing through to seeding in one day. Sometimes if the weather is very dry and the square is hard, they may complete the fraise mowing on one day, ask you to water or wait for rain to soften the ground and then complete the seeding, fertiliser application and loam topdressing. Whilst every effort has been made to ensure the accuracy of the information contained in this guide, you should always comply with the law and follow best practice grounds maintenance guidance. Works should only be undertaken following a health and safety risk assessment by a trained and competent person using the right equipment in the right weather and ground conditions. If in doubt, contact your local County Pitch Advisor or the Grounds Management Association Page 4 of 10 Pack 2 (Square resurfacing to max 20 mm depth) What is the aim of this pack? Pack 2: To remove all the grass and thatch surface layers of the soil profile (to a maximum of 20 mm below finished square level). To then replace this soil with new imported cricket loam Compactable with the existing loam, keyed in, graded and compacted to restore levels and then a new dwarf ryegrass (Lolium perenne) sward is established from seed. The aim is to improve ball bounce by removing thatch. Bounce may be a little low in the first year following the works but will improve in subsequent seasons and soon exceed that of the square before the work. What work does this pack involve? Pack 2: This is similar to Pack 1 but planes the surface off the top of the square using a tractor mounted machine. The contractor will cut the surface off in one or two layers – initially removing grass, then any thatch layers and a bit of soil. This material will be carried away on a trailer and is normally tipped on site to rot down. Once the contractor has done this, the contractor begins to rebuild the surface back to the original level using new loam. Before importing the loam, the contractor will scuff the surface to create a key before adding and compacting layers of the new loam. It is really important that the contractor uses the same loam your square is constructed from (or if you’re not sure what it is constructed from, the loam you usually use to topdress your square at the end of the season) – if you are not sure then speak to your contractor and/or your County Pitch Advisor who carried out the PitchPower visit to your square. It is important that enough loam is returned such that the level of the square is above the outfield (or water will flow into it like a pond and it will be difficult to dry after it rains. Once the required level and smoothness is reached, the square is then seeded and fertiliser is applied. The amount of loam required is much more than a normal end of season renovation – your contractor is likely to have this delivered in small 20 kg bags on a pallet but for larger squares may have the loam supplied loose-tipped or in larger 1 t bulk bags. How long does the contractor take? Pack 2: This is weather dependent but can usually be completed in two, occasionally three days. Whilst every effort has been made to ensure the accuracy of the information contained in this guide, you should always comply with the law and follow best practice grounds maintenance guidance. Works should only be undertaken following a health and safety risk assessment by a trained and competent person using the right equipment in the right weather and ground conditions. If in doubt, contact your local County Pitch Advisor or the Grounds Management Association Page 5 of 10 Preparation (both packs) What do you need to do before your contractor arrives? • As soon as possible, if you haven’t already, communicate with your contractor to let them know when your season ends, and your square is available for the work. • Arrange a provisional date with your contractor (this is often dependent on which clubs were on their orderbook first and the weather – with wetter weather causing delays. • Just before the provisional date cut the whole square to 4-5 mm grass height to help with the process. • You do not need to water the square as initial processes are best done when it is dry. • Identify the corners of the square and work with the contractor throughout to make sure that buried markers that are in the right place, are retained and replaced in the right place after the works. • Be there to arrange access. What if the weather is wet? Your contractor should not carry out the work when the outfield is soft and can be damaged by their machinery. They should also only do the work in suitable weather windows – if it is a wet autumn, it may be best to delay the work by a year than to carry out the work in the wrong weather and ground conditions. What to expect when the work is done Most of the grass from the square will be gone, it will look quite brown (or grey depending upon your loam), and a new sward will have been seeded and topdressed. Whilst every effort has been made to ensure the accuracy of the information contained in this guide, you should always comply with the law and follow best practice grounds maintenance guidance. Works should only be undertaken following a health and safety risk assessment by a trained and competent person using the right equipment in the right weather and ground conditions. If in doubt, contact your local County Pitch Advisor or the Grounds Management Association Page 6 of 10 After care and grown in (both Packs) Once your contractor has completed the work to the required standard, you will need to grow-in the grass sward. With Pack 1 fraise mowing you are usually part way there already with the remaining grass, with Pack 2 there is an entirely new grass sward to grow in. But in both cases – the following advice will help you achieve a successful outcome. It is important to carry out the aftercare well so that your project is a success. What do you need to do when they have completed the work? The aim is to establish an even, reasonably dense, cover of grass across the square before the winter, so that you will be in a good place for pre-season preparations next year. The following steps will help you do this: 1. Fence off the square: The best next step is to fence off your square to deter people walking across it and damaging levels and the new sward. Before you do this, check with your landlord if you rent your facility. You use orange/green plastic barrier fencing and steel ‘fencing pins’ hammered into the ground (you can order both of these from online suppliers, builders’ merchants or similar and it is a relatively low cost way to guide people around your square. Where people are likely to vandalise or walk through barrier fencing, a more substantial Heras fence might be required. The usage of polite signage may reduce the likelihood of people going inside the fence. Figure 2 Barrier fencing with fencing pins installed around a renovated square to prevent foot traffic. Whilst every effort has been made to ensure the accuracy of the information contained in this guide, you should always comply with the law and follow best practice grounds maintenance guidance. Works should only be undertaken following a health and safety risk assessment by a trained and competent person using the right equipment in the right weather and ground conditions. If in doubt, contact your local County Pitch Advisor or the Grounds Management Association Page 7 of 10 2. Wait for rain – don’t walk on the square until the new sward is established. The best thing that can happen, once the contractor has finished, is for light rain to fall frequently. Rain is the best form of irrigation. In these conditions the grass will germinate in seven to ten and then keep growing before winter. 3. If it stays dry, then irrigate – unless you have an automatic sprinkler system with pop-up irrigation heads around the square (which is not many squares in England and Wales) then you should avoid using irrigation until you have to. You will need to irrigate when: a. There is no rain in September and the first week of October and temperatures are falling as we head towards winter. Grass needs three things to germinate – moisture, warmth and to be surrounded by soil. If it gets too cold, it will become harder to germinate the sward. b. There is initially rain, the grass starts to germinate and then it goes dry again. The seed will need moisture to keep germinating and the new plant shoots need water to survive. New grass swards do not have deep, widespread root systems so cannot tolerate dry conditions very well. See ‘How to irrigate a new sward’ below. 4. Cut the grass at the right time to help maintain healthy, vigorous grass growth and the right sward density (sward density is the number of individual grass plants per metre square, the aim with cricket squares is to have a high sward density going into the next season; letting the grass grow longer reduces sward density and should be avoided). See ‘How and when to cut the grass on a new or reseeded square’ below. How to irrigate a new sward on a square The best way to irrigate a square is using a well-designed fully automatic pop-up sprinkler system around the square. If you have one of these, all you will need to do is turn it on (avoiding the hottest parts of the day) and keep watering daily/every other day (depending how hot/windy it is) until the grass is well established. But most grounds do not have such a system – so how is it best to water a square without walking over it and dragging hoses over it and disturbing the levels. The answer depends on water pressure and flow rate. If you have good pressure and flow rate you may be able to use a part-circle impulse/impact sprinkler from around the outside of the square. With good flow rate, the water thrown from one side, will overlap with the other. By moving the sprinkler around, you will be able to cover the whole square. For example, see the approach in Figure 3. By moving the sprinkler from positions 1 to 2 to 3 and so on to 6, and adjusting the rotation from 90° to 180°, you can cover the whole square from the outside, as long as the water overlaps in the middle as shown. Wider squares might require two or three half-circle positions along each side, it doesn’t matter as long as it throws over half the length of the square in the shorter direction. Whilst every effort has been made to ensure the accuracy of the information contained in this guide, you should always comply with the law and follow best practice grounds maintenance guidance. Works should only be undertaken following a health and safety risk assessment by a trained and competent person using the right equipment in the right weather and ground conditions. If in doubt, contact your local County Pitch Advisor or the Grounds Management Association Page 8 of 10 Figure 3 Irrigation sprinkler patterns to cover a square. What if I don’t have a sprinkler? You don’t need a rotational sprinkler, you can water by hand with a rose on the end of a hose to form a spray (not a jet), but you must make sure you water for enough time in each location and that there is not a dry spot in the middle. A long telescopic lance can help you reach further. The advantage of a sprinkler is that you can do something else whilst the water is being applied and it can water more evenly. How long is ‘enough time’? It’s enough to keep the surface wet, without watering so much that you start to cause water to flow across the surface taking soil and seed with it – particularly on sloping squares. What time of day should I water? Aim to keep the soil moist during dry periods. Water early or later in the day. What if I can’t reach the middle because pressure and flow are too low? If there is not enough pressure and flow rate to cross in the middle as shown, then you may have to walk over the square. You can reduce damage by: • Using small portable boards or mats to spread your weight – particularly if you are going to be standing still. • Getting someone to help carry the hose so it is not dragged across the square. • Walking up and down the edge of two pitches rather than down the middle of a pitch. • Lightly brushing behind you to remove footprints How do I know when my grass is germinating? Early signs of germination are shoots piercing through the soil. With perennial ryegrass these can be difficult to spot because they are a purple-red colour and very thin, which is difficult to spot against the orangey/grey/brown colour of the loam. Whilst every effort has been made to ensure the accuracy of the information contained in this guide, you should always comply with the law and follow best practice grounds maintenance guidance. Works should only be undertaken following a health and safety risk assessment by a trained and competent person using the right equipment in the right weather and ground conditions. If in doubt, contact your local County Pitch Advisor or the Grounds Management Association Page 9 of 10 A tip is to get down low to the ground and look across at ground level – you will see the shoots appearing. These will soon emerge is fine green leaves. These will need to grow and develop into true leaves. Depending on the weather, four to six weeks after germination, the grass should be ready for its first cut. Figure 4 A new sward on a square, three weeks after seeding. How and when to cut the grass on a new or reseeded square Once the grass has germinated and is starting to establish, the grass will be young and the top surface is soft (especially with Pack 2), so be careful when carrying out any maintenance. It is particularly difficult when a pitch has been constructed at the end of the season going into a wet autumn-winter period. It is better to stay off than to cause damage. Only carry out work on the square when ground and climate conditions are suitable. If you are in any doubt stay off and contact your local County Pitch Advisor via your cricket board for some advice. • When the grass cover has started to establish and you can walk on the square without loam sticking to your boots (this could be up to 6 weeks), aftercare maintenance can start. • The aim for the first cut is to lightly ‘top’ the grass to encourage it to thicken up and strengthen. This should be done with a sharp mower that has a roller on the rear to help to spread the weight of the machine. Choosing a lighter weight mower will help to reduce the impact of the machine and often a sharp rotary mower is best because there is no front roller to flatten the grass ahead of cutting. Aim to just remove the leaf tips during the first cut. The second cut a few days later can remove more grass, but never more than 1/3rd of the total length. Try to maintain the grass at 20 mm going into winter, to help maintain sward density. The purpose of cutting at this height is to help encourage tillering and a good sward density. It is better to leave it to grow in moist conditions (it will slow down in the cold of the winter anyway) than it is to try and mow it when wet and then damage the surface levels with the mower (or your feet!). You can always overseed in the spring to help with grass cover, so do not panic. Cut when you can but do not walk on the square when frosty to cut. • If you do not have access to a rotary mower – then you can use a lighter pitch cylinder mower, just make sure the blades are sharp and well set and that you have adjusted the cut height properly to that you do not pull or tear the leaf (which can increase disease risk). Whilst every effort has been made to ensure the accuracy of the information contained in this guide, you should always comply with the law and follow best practice grounds maintenance guidance. Works should only be undertaken following a health and safety risk assessment by a trained and competent person using the right equipment in the right weather and ground conditions. If in doubt, contact your local County Pitch Advisor or the Grounds Management Association Page 10 of 10 • As you come into late February – March, gradually reduce the height of cut to your summer mowing height of c.15 mm. Do not go too short too soon or you will stifle root growth. If the grass does become too long, the height of cut should be reduced gradually over 3 – 4 cuts allowing some time for recovery in between. N.B. On no account should the grass height be reduced by more than 1/3rd on any one occasion. What other after care maintenance is required? Fertiliser application – New grass swards have smaller roots which makes it harder for them to access nutrients in the soil – applying fertiliser helps to make sure that sufficient nutrients are available to support growth and establish a strong sward. It is better to slightly under feed than to over feed. For information about fertiliser types and how to apply then, refer to the GMA cricket toolkit. Weed control. Squares are often small enough to hand-weed rather than apply a chemical weedkiller – when the square is dry, use a flat bladed screwdriver to lift weeds and their roots – do not leave tap roots in the soil or the weed can come back. Fill the hole with a mix of loam and grass seed and brush to surface level. If necessary (where weeds are widespread or creeping), apply a selective herbicide in the spring (if required). This to be applied at least two weeks after the first fertiliser treatment (April) and at a time when grass growth is strong and healthy. NB. Do not apply herbicide during periods of potential turf stress, i.e. if the weather is hot and dry or if frosts are forecast. Apply herbicide strictly according to the manufacturer’s label and only by suitably qualified personnel. Use pedestrian machinery – do not use tractor mounted sprayers – there is a risk of damage to surface levels. Pre-season rolling As you begin to bring your square back into play you should still do some pre-season rolling but build the weight up slowly. Applying a roller to soft ground and cause significant damage on or below the surface, which may not be readily apparent and may significantly compromise the work you have just had done, so a cautious approach is essential – start by cutting with cylinder mowers and using their weight to gradually compact the surface before introducing an unballasted roller, and then build the weight up from there. Only apply a roller when you are confident that the surface has compacted enough under mowing and conditions are dry enough to not cause any visual impact or create ridges or mark the soil in any way. If in doubt wait until the soil dries more so that there is no visual impact – you can always catch up with rolling when the conditions improve. Summary The key to maintaining a rejuvenated cricket square is patience and not to panic – if you think it is too wet to put machinery on – it probably is – so keep off it and err on the side of caution. There will be a dry day eventually and you can catch up – but it is difficult to undo the damage caused by going on a rejuvenated cricket square when it is too wet or soft.
 Tweet
Tweet